Extracting data from SC Navigator into Databricks
This article describes how you can get output data from your AIMMS SC Navigator cloud account into your own Databricks environment. You can download the example Jupyter notebook here and use the template directly in your Databricks environment, or use it locally if you have Python installed.
What to do in AIMMS
Each AIMMS SC Navigator cloud account is by default equipped with an Azure Data Lake Storage Gen2 (ADLS). For this route we will be utilizing the external access to this storage account for retrieving the exported data. It is therefore crucial that in the save results screen you check the option to export the results to the ADLS too:
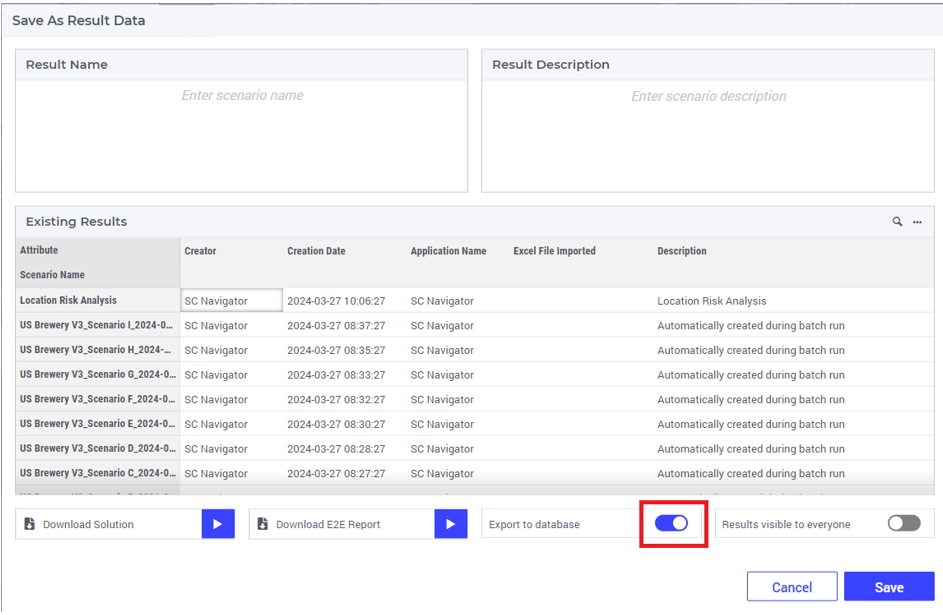
The results will be saved in the parquet file format in the export folder of the ADLS.
You will also need to create a SAS-token to access the files in the export folder to allow access to the ADLS. You can find instructions on how to do this on the page SAS Tokens.
Configuration in Databricks
You can download this full Jupyter notebook example and replace the ‘TODO’-items in the notebook with your own variables. Below we will describe the code fragments and how they can be used.
In Databricks you will be using Python packages for the connection to the ADLS. First these need to be installed:
1%pip install azure-storage-file-datalake azure-identity
Including a restart to apply them:
1# restart python to apply installed packages
2dbutils.library.restartPython()
Then you’ll need to provide the SAS-token and the URL, both of which are exposed/generated in the previous step when creating the SAS-token:
1# TODO: provide the sas token and the URL of your storage
2account_url_full = "<put here your URL>"
3# remove the folder from the url
4account_url = account_url_full[:-20]
5sas_token = "<put here your sas token>"
6# the file system is fixed, this is the container SC Navigator will write its results
7file_system="sc-navigator-export"
You’ll need to import more required packages:
1import os
2from azure.storage.filedatalake import (
3     DataLakeServiceClient,
4     DataLakeDirectoryClient,
5     FileSystemClient
6)
7from azure.identity import DefaultAzureCredential
And create a DataLakeServiceClient to access the storage:
1# create a DataLakeServiceClient to access the storage
2dsc = DataLakeServiceClient(account_url=account_url, credential=sas_token)
You can now list all available scenarios on the storage:
 1# list all available scenario's on the storage
 2# Note that you need to save the scenario from SCN with datalake storage enables before they will be visible!
 3file_system_client = dsc.get_file_system_client(file_system=file_system)
 4paths = file_system_client.get_paths()
 5list_of_scenarios = list()
 6for path in paths:
 7     if "/" not in path.name and path.name != "info.txt":
 8             print(path.name + '\n')
 9             list_of_scenarios.append(path.name)
10     else:
11             continue
If this code block gives an error, please check the provided URL and the SAS token (this token needs to be valid and cannot be expired). For further reference we refer to the {field{*fldinst HYPERLINK “https://learn.microsoft.com/en-us/azure/storage/blobs/data-lake-storage-directory-file-acl-python?tabs=azure-ad”}{fldrslt Microsoft documentation}}.
Results on the ADLS are stored per scenario - in this next code fragment you can decide which scenarios you actually want to load. If you do not specify specific scenarios all scenarios will be loaded:
1# the results are stored per scenario. You can change the list of scenario's to load if you change the list_of_scenarios variable.
2# list_of_scenarios = ["<scenario_1>", "<scenario_2>"]
3# this code creates a directory client per scenario to load its files
4dictionary_of_scenario_clients = {}
5for scenario in list_of_scenarios:
6        client = dsc.get_directory_client(file_system=file_system,directory=scenario)
7        dictionary_of_scenario_clients[scenario] = client
And consecutively load the files for the selected scenarios:
 1# load the files for the selected scenario's
 2import io
 3import pandas as pd
 4from collections import defaultdict
 5results = defaultdict(list)
 6paths = file_system_client.get_paths()
 7for path in paths:
 8   if "/" in path.name:
 9      scenario = path.name.split("/")[0]
10      file_name = path.name.split("/")[1]
11      if scenario in list_of_scenarios:
12         try:
13            file = client.get_file_client(file_name)
14            data_file = file.download_file()
15            data_binary = data_file.readall()
16            parquet_file = io.BytesIO(data_binary)
17            df = pd.read_parquet(parquet_file)
18            df["scenario_id"] = scenario
19            results[file_name.split(".")[0]].append(df)
20         except:
21            print(file_name + " could not be loaded into a dataframe")
Then it is useful to combine the list of dataframes into one dataframe per file type:
1# combine the list of dataframes into one dataframe per file type
2dataframes_for_visualization = dict()
3for k,v in results.items():
4        df = pd.concat(v)
5        dataframes_for_visualization[k] = df
To show all data:
1# show all data
2[k for k,v in dataframes_for_visualization.items()]
In this notebook we now select the end to end report for all scenarios. In a similar way you can select and save other data files.
1# in this example we use the end-to-end-report only but other data can be processed in a similar manner
2df_e2e = dataframes_for_visualization["end-to-end-report"]
3display(df_e2e)
Then you’ll need to do some final post-processing so data can be stored as a hive_table, considering Spark cannot handle spaces or brackets and they are present in the exported parquet-files:
1# do some final post-processing so data can be storred as a hive_table
2# spark cannot handle spaces or brackets
3import numpy as np
4df_e2e.columns = [x.replace(" ", "_") for x in df_e2e.columns]
5df_e2e.columns = [x.replace("(", "") for x in df_e2e.columns]
6df_e2e.columns = [x.replace(")", "") for x in df_e2e.columns]
7df_e2e = df_e2e.replace({None: np.nan})
In the last step we actually save the results:
1# save to databricks hive storage
2# you can choose to use another destination for example csv files or a database
3df_spark = spark.createDataFrame(df_e2e)
4df_spark.write.saveAsTable("SC_Navigator_e2e")
That’s it! With the example Jupyter notebook download you will have a quick start to getting your SC Navigator data into the Databricks environment. From Databricks you can easily load the data into PowerBI or other visualization tools.