Geocodes Data
This section explains how the Geocode page works in the application. This functionality is only available in the Network Design Advanced Module. The purpose of the Geocode page is to allow the user to inspect and adapt the data related to the coordinates of the used locations. More specifically, you need to provide data for (some of) the following attributes on the Location sheet:
Street
City
State
Postal Code
Country
Country Code
The Country or Country Code attribute is mandatory, while in general it would be good to have at least City or Postal Code, and State if that is relevant for that country.
Note
The Postal Code works best in combination with Country Code, as in that case a specific postal code logic will be activated, which in general produces better results. The country codes, as well as the Country in two letters, should come from ISO 3166-1 alpha-2 codes, and the model will verify that the provided country codes are in this list.
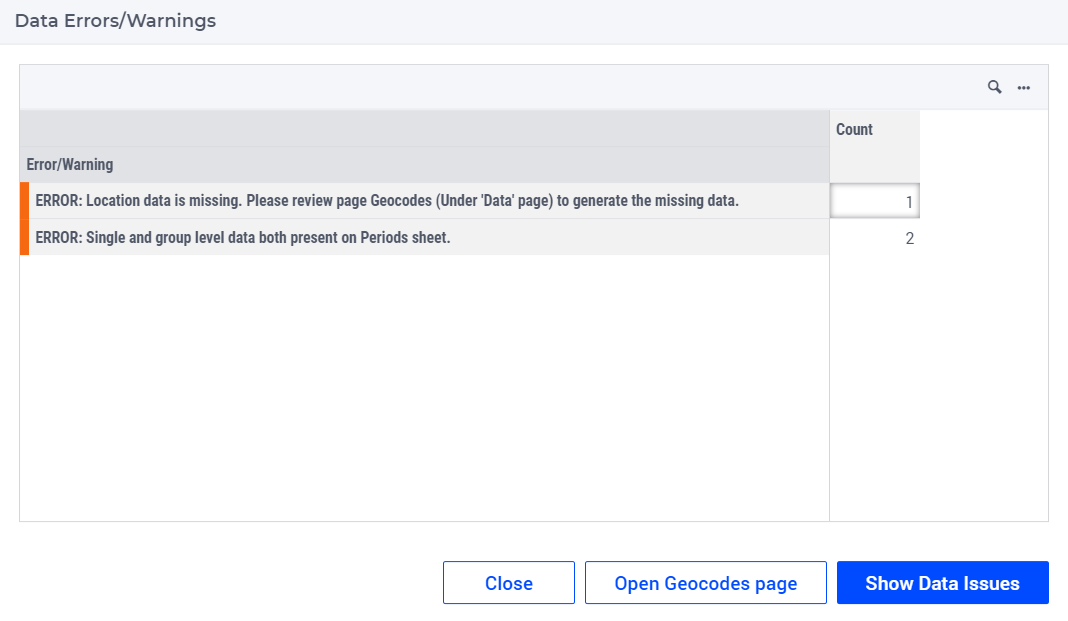
This page is not visible in the workflow by default. After loading the input data, the dialog page Data Errors/Warnings shows up and you can select the Open Geocode Data option to navigate to that page, if the input data contains a location which has at least one of the previously mentioned attributes.
At this stage the Geocode button becomes visible in the workflow.
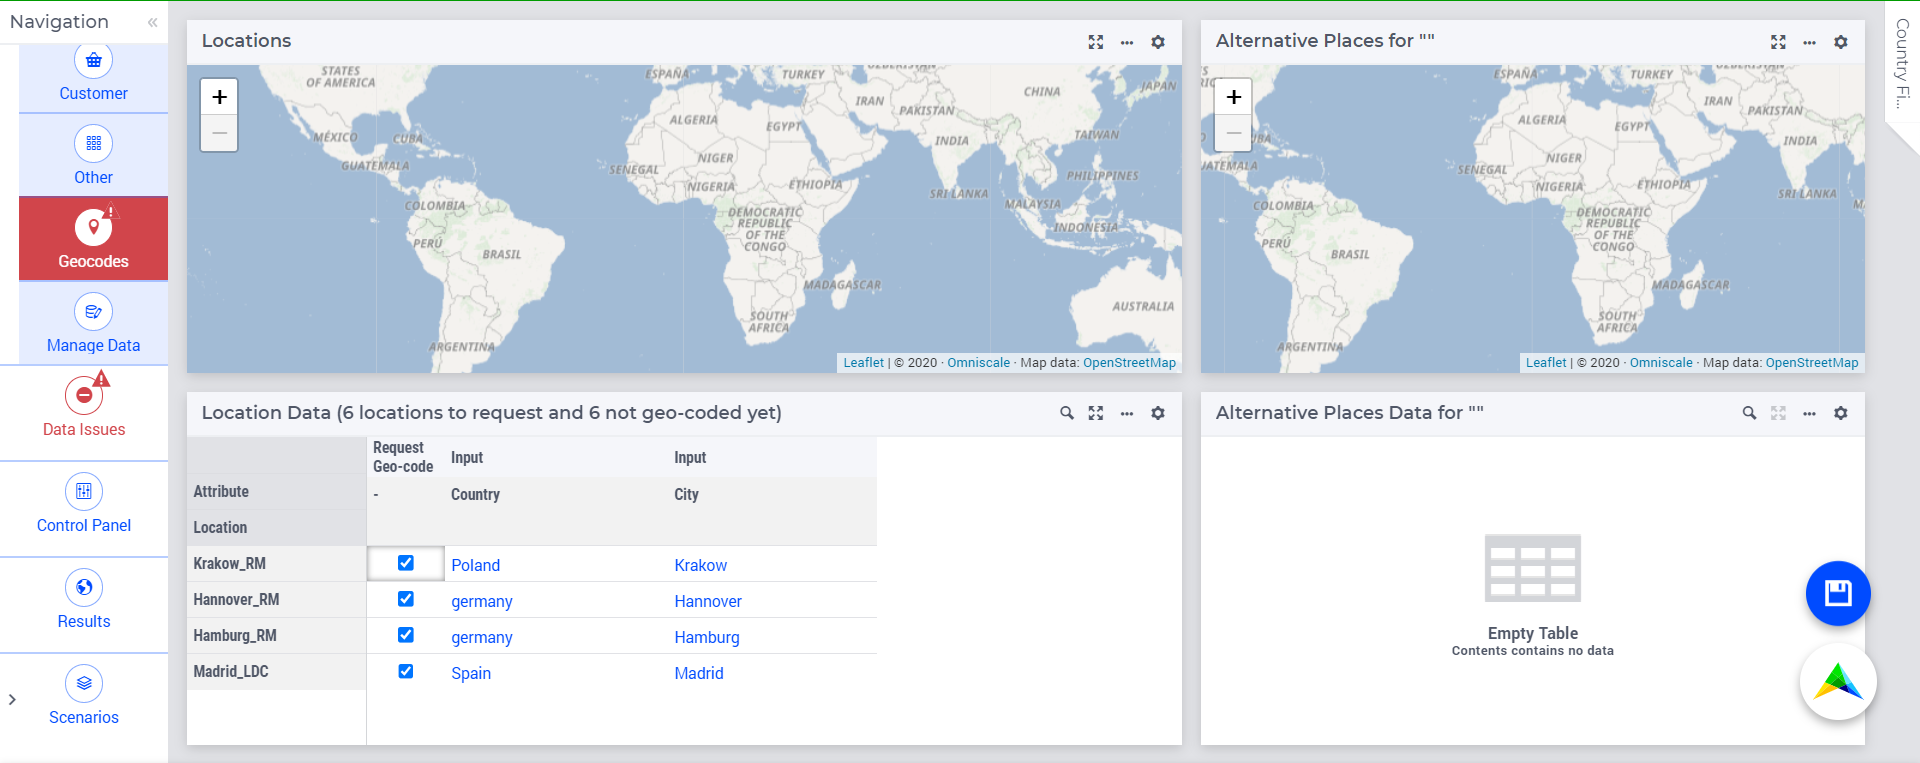
Once you open the page, you see the locations for which the coordinates are still needed, via checkbox Request Geo-code, in table Location Data. You can retrieve the Geo-coordinates for all the selected locations via the page action Retrieve Geo-coordinates. This uses the Street, City, Postal Code, State, and Country to obtain the coordinates, together with more details on that location. Once you have inspected those results, you need to save them via the Save Location Data page action menu. This saves the data so that it can be retrieved the next time you are loading this Excel file.
On this page, you also have the ability to filter the locations by country via the Country Filter side panel. In this filter, you see the name of the country followed by something like (5 of 9 locations). The 5 indicates the number of locations for which we don’t have geo-coordinates yet, and the 9 indicates the total number of locations in that country. Initially, all countries will be selected if you have 2500 or less locations, otherwise only the first country will be selected. The reason for this choice is that the map/pages become somewhat slow if you show too many locations.
You can retrieve the geo-code data by clicking on the icon  . After doing so, the tables and the maps will show the details of the locations.
Important
Once Data Navigator has retrieved the coordinates of the locations, you need to review the results to make sure they are correct. In most cases the results with an Importance of 0.3 or higher are correct. In case the value is lower, you should inspect the results in more details. You can check to see if the size is comparable to similar location, and if the Name, Class and Type make sense. However, this does not hold when the the specific postal code model is activate (by providing just the Postal code and Country code), as the importance will always be 0.1. (You will also see that the Output Class is “place” and Output Type will be “postcode”).
Location Data Table
The header of this table contains the number of locations for which Request Geo-code is checked and the number of locations that still have to be geo-coded. This table contains all locations in the selected countries together with details of the locations, such as:
A checkbox to indicate if geo-code data needs to be retrieved.
Input Data (e.g. Street, City, Postal Code, State, Country)
Latitude, Longitude: these come from the geocoding service
Importance: according to the Location IQ Calculated importance of this result compared to the search query the user has provided. Ranges between 0 and 1. (Source: https://locationiq.com/docs). Here 1 is the best and 0 is the worst.
Size: a measure of the size of the location. The smaller this value is, the smaller is the region which describes the location. This value is larger if you are geocoding a country, but should be smaller if you are geocoding a city.
Count: the number of geo-coordinates which are returned for one location
Output Data (e.g. State, Country, Postal Code, Country Code): these output values can be compared to the input values to determine the quality of the solution.
If you click on the column of the location, then the location will be highlighted in green in the table and on the Locations Map.
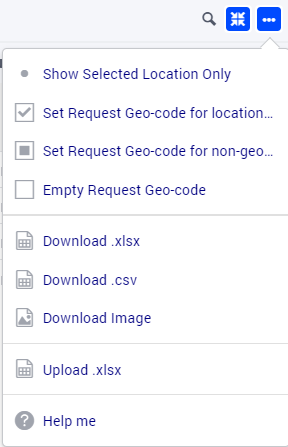
By clicking on the icon  on the top right part of the table widget you will see the four different widget actions for that table:
Show Selected Location Only: If you click this, the table will only show the data for the selected location.
Request Geo-code for selected locations in table: Set Request Geo-code for all locations in the selected countries (all locations visible in the table).
Request Geo-code for selected non-geocoded locations in table: Set Request Geo-code for all locations in the selected countries (the locations visible in the table) which have not yet been geo-coded.
Empty Request Geo-coded: Empty Request Geo-code completely.
Locations Map
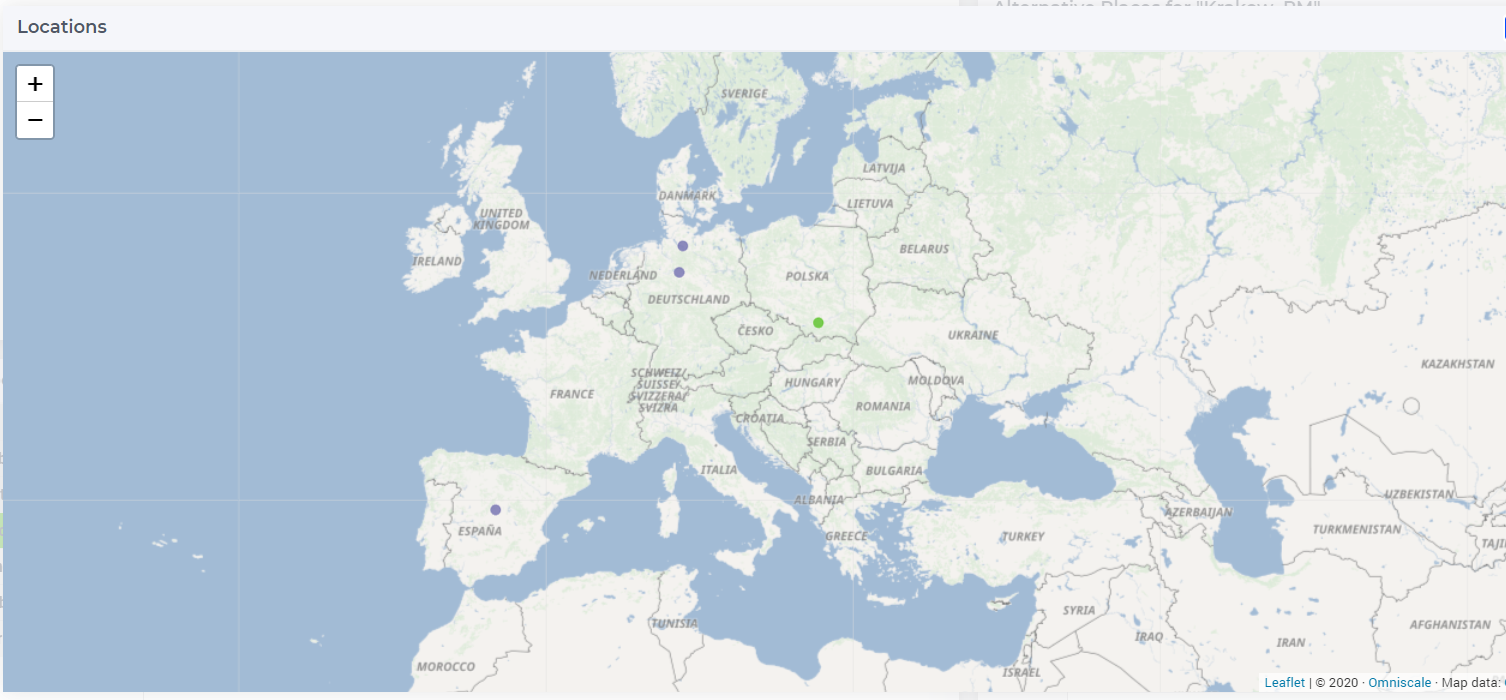
This map shows all the locations based on their coordinates. If a location has not been geo-coded, the map shows a red circle in the center of the earth, an visual indicator that data is still missing. The location selected on the map or in the table Location Data is highlighted in green. It can help you inspecting the solution provided by the geocoding service.
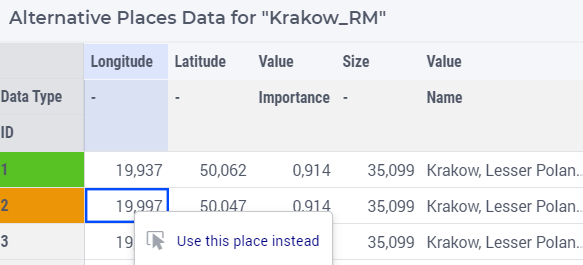
Alternative Places Data Table
The geocoding service can return multiple places. The model picks the one with the highest importance, but it shows alternative places as well. If you select some locations from the Locations map or from the Locations Data table, then the table Alternative Places Data will show the places with lower importance value.

This table contains all the details for the alternative places, such as:
Latitude, Longitude: these come from the geocoding service
Importance: according to the Location IQ Calculated importance of this result compared to the search query the user has provided. Ranges between 0 and 1. (Source: https://locationiq.com/docs). Here 1 is the best and 0 is the worst.
Size: a measure of the size of the location. The smaller this value is, the smaller is the region which describes the location. This value is larger if you are geocoding a country, but should be smaller if you are geocoding a city.
Count: the number of geo-coordinates which are returned for one location
Output data (e.g. State, Country, Postal Code, Country Code): these output values can be compared to the input values to determine the quality of the solution.
The place with the highest importance value is highlighted in green. This place can also be found in the table Location Data. You can select other place as well, for example, by clicking on one of the columns of the place in the table or by clicking on its node on the map. The selected place will be highlighted in orange in the table and its node will be marked in orange on the map. Once you select a node on the map or a row in the table, you can click the right mouse menu “Use this place instead”. In that case, this place is used in the Location Data table.
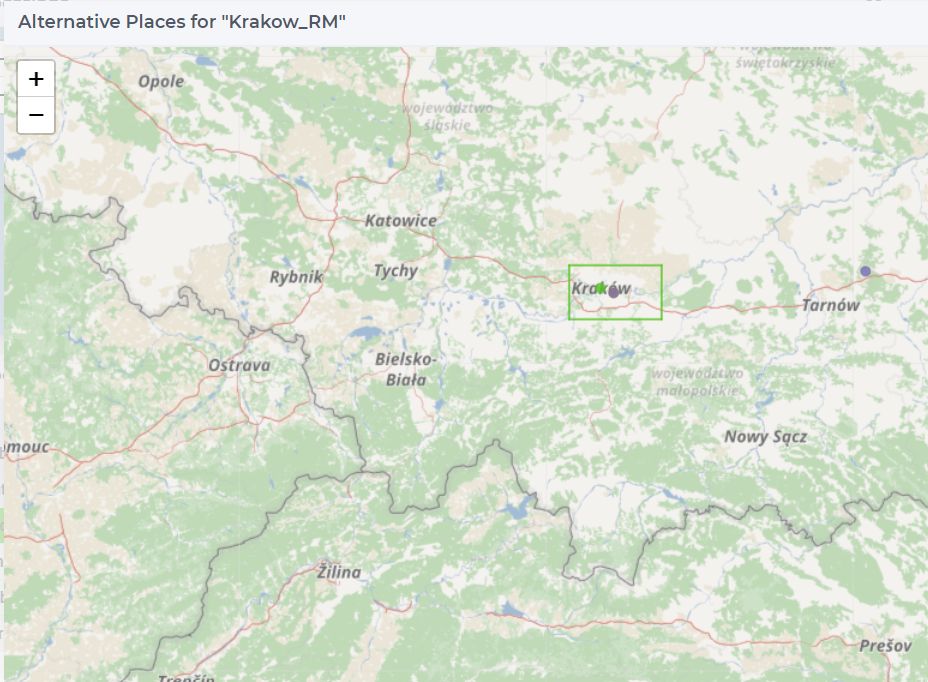
Alternative Places Data Map
The geocoding service can return multiple places. The model picks the one with the highest importance, but it shows alternative places as well. If you select some locations from the Locations map or from the Locations Data table, then the map Alternative Places will show the places with lower importance value.

The node which is used in the Locations Data table is marked in green, while the selected node is marked in orange. On the map you can also see a green rectangle. This is the smallest box that covers the complete location.
Saving the Data
After retrieving the geo-codes you should save the Geo-Code data.
You can save the data by clicking on the icon  in the lower right part of the page.
Important
As mentioned before, it is important to click the page action Save Location Data, so that this data is stored. Only after doing so, the page will get the check-mark for completion in the application workflow.