Scenario Pages Layout
Individual Scenarios are the building blocks for interactive scenario planning. The workflow has been designed such that there is a common structure among all six of the base layer Scenario categories. Having a common layout and workflow ensures that the user can create and edit Scenarios in an efficient way, reducing the learning curve for users that work with multiple Scenario types. This section outlines the shared layout and common features when viewing, creating, or editing Scenarios.
All Scenario pages have two main page areas: the Data Tabs and the Editing Area. The Data Tabs area provides a display of data relevant to the specific Scenario category, while the Editing Area allows users to view, modify, and create new Scenarios.
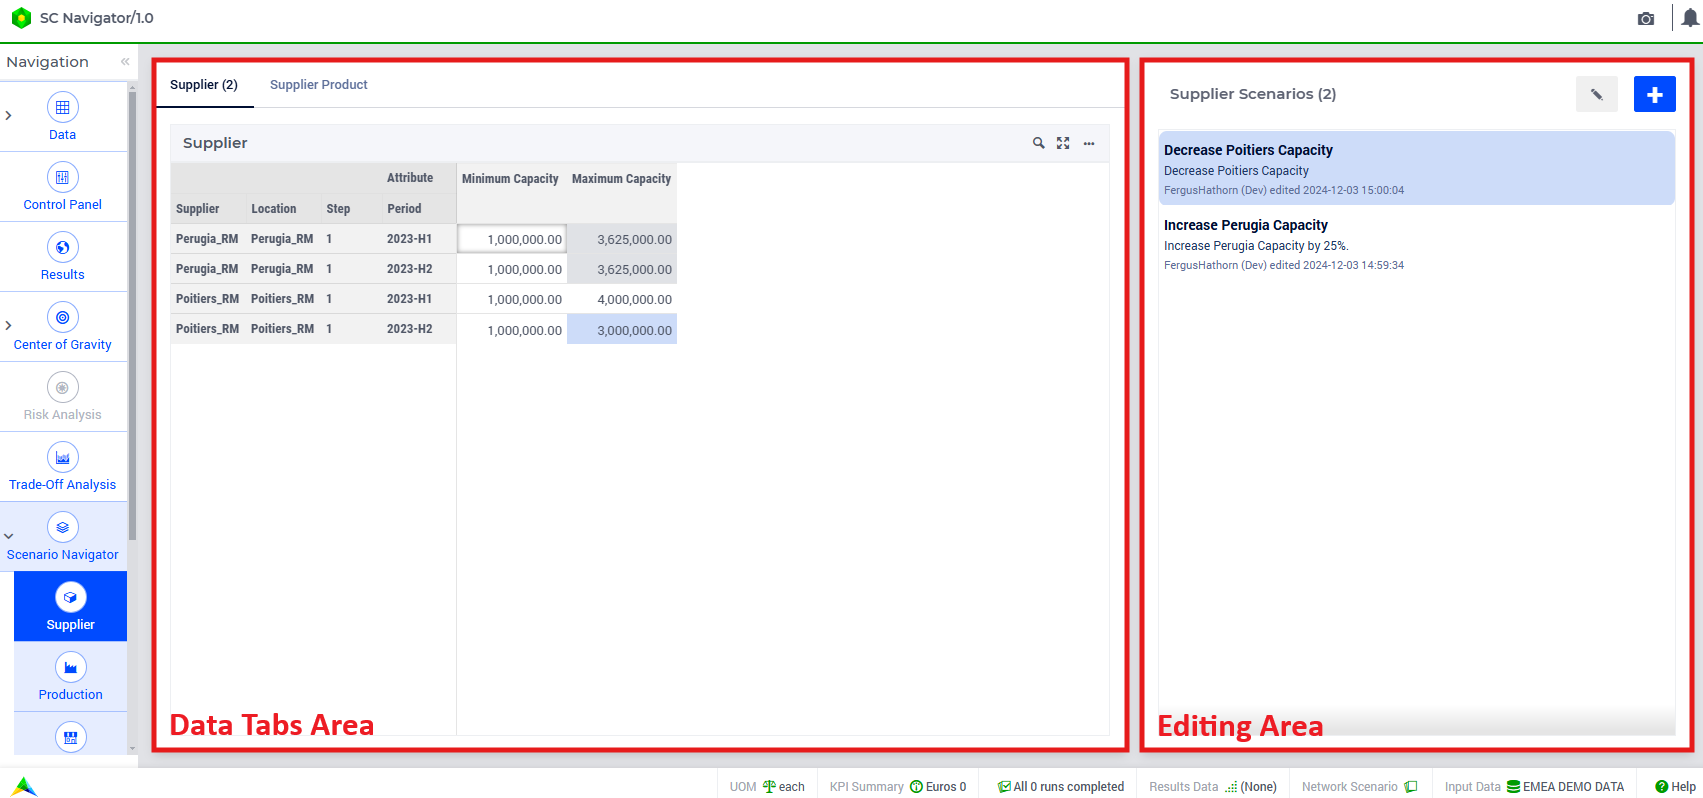
To load existing Scenarios, go to Editing Area and click on the
 button. A list of available Scenarios will be displayed below.
To create a new Scenario from scratch, go to Editing Area and click on the
 button. Follow the on-screen instructions to define the new Scenario.
Note
To read more about specific Scenario Types, navigate to the Scenario pages:
Data Tabs Area
The main purpose of this section is to display data relevant to each Scenario category, organized into multiple tabs. For instance, the Supplier Scenario category includes Supplier and Supplier Product tabs. The Supplier tab displays data at the supplier level, while the Supplier Product tab presents data at the product level associated with suppliers. These tabs align closely with the associated sheets found in the input template. The currently applied Scenarios that are associated with each tab will be shown in the Editing Area on the right.
Annotations in Data Tabs
Annotations help indicate which data points are affected by different Scenarios. These annotations can be either blue or grey:
Blue annotations show that the data points are influenced by the currently selected Scenario (chosen from the Editing Area).
Grey annotations indicate that the data points are influenced by a Scenario that is not currently selected.
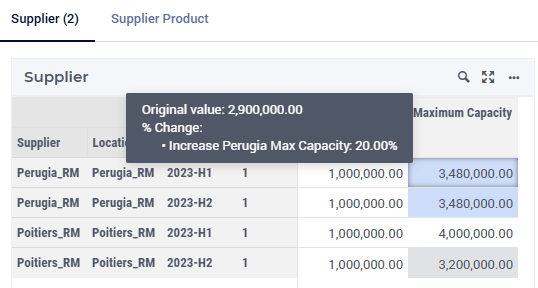
Selecting a Scenario does not change how it affects the data; it simply highlights which specific data points are impacted. For example, in the screenshot below, the blue annotations show the data points influenced by the selected Scenario, “Increase Perugia Max Capacity,” while the grey annotations show data points affected by other, unselected Scenarios.

Tooltips in Data Tabs
When you hover over a data cell with an annotation, a tooltip will appear showing detailed information, including:
The original value of the cell (before any Scenarios were applied).
The type of change applied (such as a percentage change, a value increment, or an overwrite of the original value).
The Scenario(s) responsible for the change.
For example, in the screenshot below, the tooltip shows that the original value was 2,900,000, and a 20% increase was applied due to the “Increase Perugia Max Capacity” Scenario.
Item actions in Data Tabs
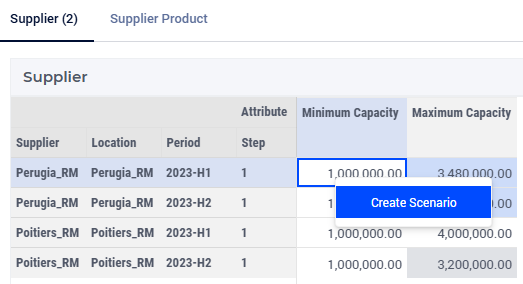
You can create a Scenario by right-clicking any cell in the Data Tabs. This action works similarly to clicking the  in the Editing Area, but some details will be automatically filled in based on the cell you right-clicked.
For instance, if you consider the screenshot below, right-click the “Minimum Capacity” column for Perugia_RM and select “Create Scenario,” the new Scenario will automatically show Supplier as Perugia_RM, Location as Perugia_RM, and Attribute as Minimum Capacity.
Editing Area
The purpose of the Editing Area is to show which Scenarios are applied to the data, allow users to adjust which Scenarios are applied, and to enable users to create new Scenarios as well as edit existing ones. The Editing Area has three modes, each with a distinct function:
List Mode is primarily responsible for displaying the individual Scenarios that are currently applied to the data.
Edit Mode enables the user to add and remove Scenarios that are currently applied.
Create Mode enables users to create new Scenarios, or to edit existing ones.
Each of the three modes in the Editing Area will be outlined in more detail below.
1. List Mode
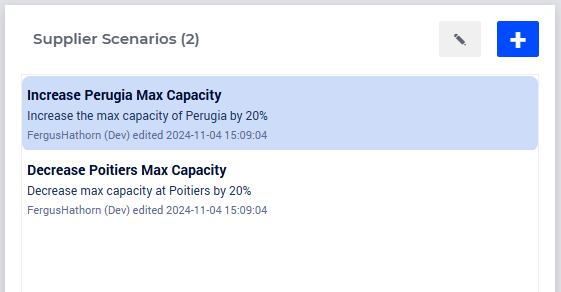
List Mode provides an overview of which Scenarios are currently applied to the data. In the case shown in the screenshot below, there are two Supplier Scenarios shown in the list. Selecting a Scenario in this list also activates the annotations showing the affected data in the Data Tabs. The figure below shows the part of the List Mode area, indicating that there are two Supplier Scenarios applied.
Edit Button
The  button changes the mode from List Mode to Edit Mode, allowing the user to make a different selection of Scenarios. If a Network Scenario is currently loaded, it also allows the user to adjust which Scenarios are part of the Network Scenario. If no Network Scenario is loaded, the Edit button simply allows users to choose which Scenarios should be applied to the data while creating a new Network Scenario.
Create Button
The  button changes the mode to Create Mode, allowing the user to create a new Scenario. The created Scenario will be added to the Scenarios in List Mode once it is saved.
Item Actions in List Mode
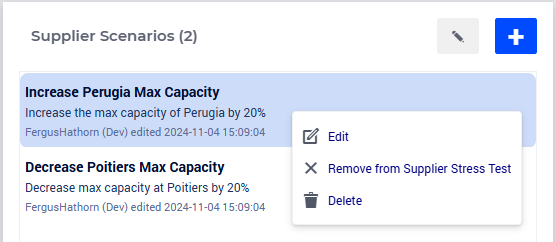
The user is presented with item-actions when right-clicking on a Scenario in List Mode:
Edit allows users to edit the Scenario, for example, changing which Suppliers are affected in a Supplier Scenario.
Remove from allows users to remove the Scenario from the current Network Scenario. Note, this action is only available when a Network Scenario is loaded.
Delete allows users to delete the Scenario from their storage. However, if the Scenario is part of the current Network Scenario, it cannot be deleted directly, and the Delete option will appear inactive.
Tooltips in List Mode
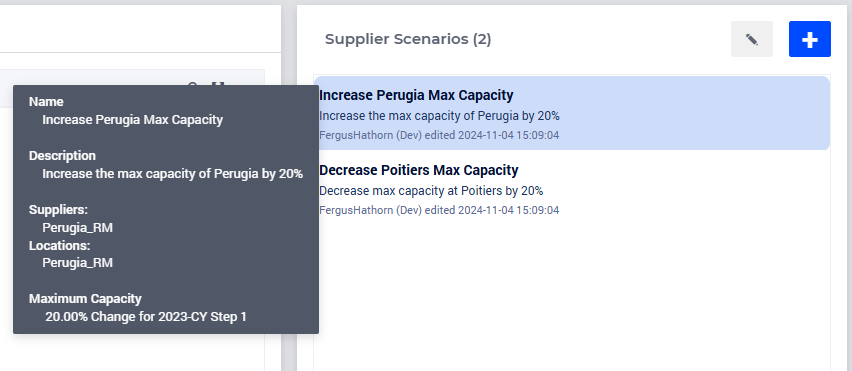
Hovering over a scenario will show a tooltip that contains important information about the Scenario, such as the name, description, entities and locations that are affected, the attribute, and the actual adjustment that was made. Below is a screenshot demonstrating a tooltip for a Supplier Scenario.
2. Edit Mode
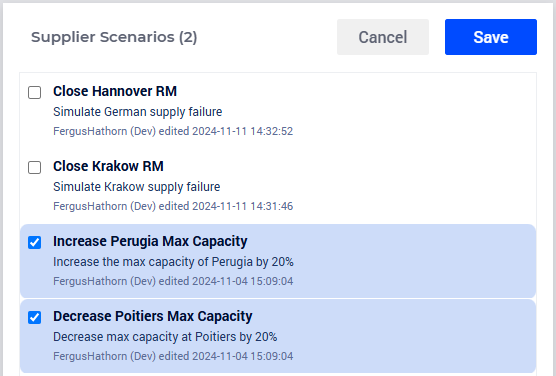
Edit Mode allows users to change which Scenarios are applied to the data (shown in List Mode). If a Network Scenario is loaded, the Edit Mode enables the user to edit which Scenarios are contained in the current Network Scenario. Edit Mode can be shown by clicking on  when in List Mode. The screenshot below shows two highlighted Scenarios with ticked checkboxes, and two Scenarios that are not checked. In this case, the two unchecked Scenarios are not part of the loaded Network Scenario. The Scenarios can be added to the Network Scenario by checking the boxes and pressing Save. Note that Scenarios will only be highlighted if they are part of the loaded Network Scenario or are applied to the data; checking the checkbox does not affect this, as changes to which Scenarios are applied are only made when pressing Save. If there is no Network Scenario loaded, the Save button will be replaced with an Apply button, allowing the user to apply their selection of Scenarios to the data without a Network Scenario.
Cancel Button
Pressing Cancel will return to List Mode, all changes to Scenario selection will be reverted to the state they were in before pressing  .
.
Save and Apply Buttons
Depending on whether or not a Network Scenario is loaded, there will be an option to Save or Apply the changes to the selection in Edit Mode:
Save is an option when a Network Scenario is already loaded. Upon pressing Save, the user will be presented with the option to Cancel, Overwrite, or Save As. These options are discussed in more detail in the section Save and Overwrite.
Apply is an option when there is no Network Scenario loaded. Pressing Apply will apply the current selection of Scenarios to the underlying data.
Item Actions in Edit Mode
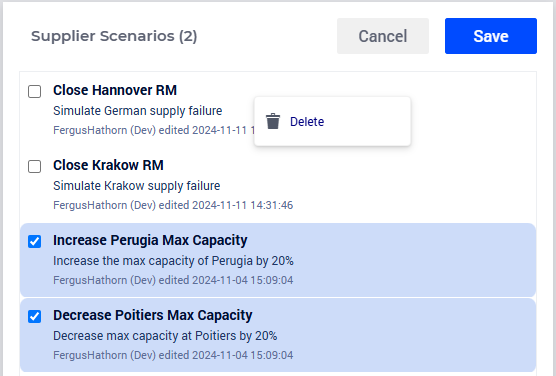
The user can delete Scenarios while in Edit Mode by right-clicking on the Scenario that they want to delete, and selecting the Delete item action. However, if the Scenario is part of the current Network Scenario, it cannot be deleted directly, and the Delete option will appear inactive.
3. Create Mode
Create Mode allows users to create new Scenarios, as well as edit existing ones. Create Mode can be accessed when editing an existing Scenario (right-click on the Scenario and select Edit), or when the users wants to make a new Scenario, which can be done by clicking on  when in List Mode, or by right-clicking directly on a datapoint and selecting Create Scenario. The input fields shown in Create Mode differ based on the type of Scenario being created, however, the overall structure of this page area is fairly consistent. The screenshot below shows Create Mode for a Supplier Scenario:
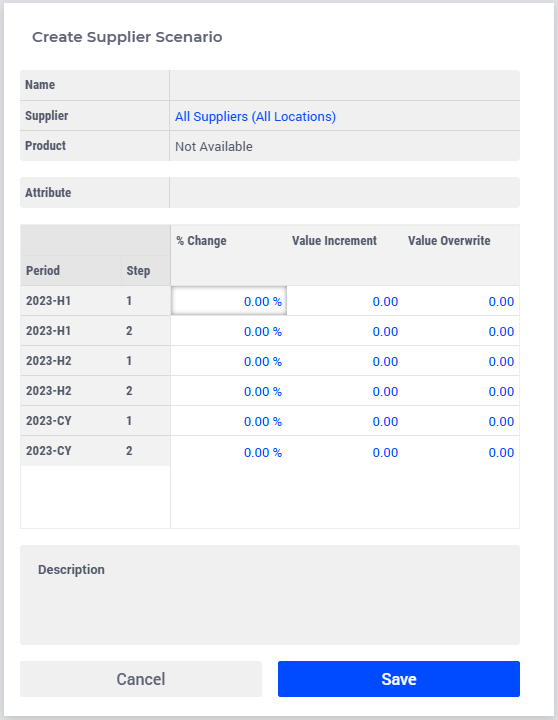
As seen in the screenshot above, Create Mode has four input sections and two buttons. We will outline the main functions for each of these input sections below. Saving the Scenario (pressing Save) is addressed in Save and Overwrite.
Name and Selection

The first set of inputs in Create Mode starts with the Scenario name, see the screenshot above. This section will be prepopulated if the user is editing an existing Scenario, or if they are creating a Scenario directly from the data. It is imperative for the user to provide a name for the Scenario if they wish to save it. Below the name, there are more fields than can be filled in by the user. These fields are not free text, rather, clicking on the field will open a dialog like the one shown below.
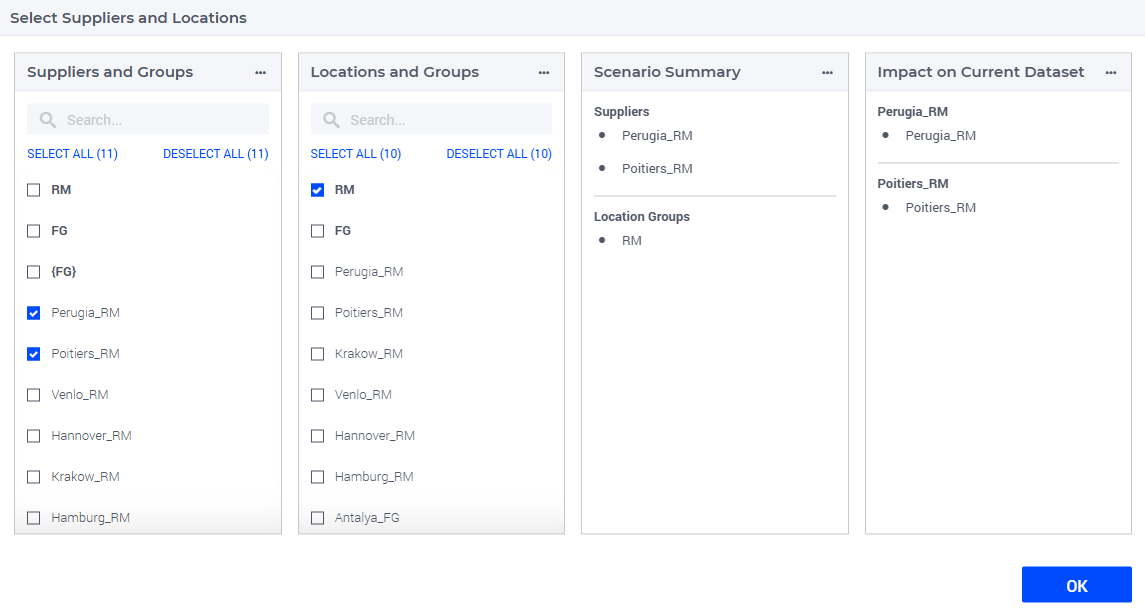
In the dialog shown above, the user can select the entity and location that should be impacted in the Scenario. Based on the dataset loaded, the user can also see the Impact on Current Dataset (far right column in the above screenshot). In this case, a location group (RM) was selected with two suppliers (Perugia_RM and Poitiers_RM). The impact on the dataset is on all supplier locations that match the selection made by the user. The impact on the dataset can differ when a Scenario is loaded with different datasets. For example, if there are two datasets, Dataset A and Dataset B, and there is a group EU Supplier Locations. If Dataset B has more locations in that group compared to Dataset A and the Scenario uses the group EU Supplier Locations instead of selecting each individual location, the Scenario will be applied to all elements in the group, thus the impact will be different for both datasets. This example covered a Supplier Location selection, but the same principles apply for selecting Products, Modes of Transport, Warehouse Locations, Production Locations, and many other combinations of entities or objectives. In all cases, selecting nothing in the dialog (shown above) will automatically select all elements. The screenshot below shows how the table is updated after the user makes their selection, in this case showing the selection as ‘Supplier (Location)’.

The next section in Create Mode is the attribute selection. This field allows the user to select which attribute should be impacted by the Scenario. Hover over this field and click the drop-down arrow, or double-click anywhere in the cell, to open a drop-down menu displaying all attributes available for selection. The user must select an attribute in order to save a Scenario. Note that each individual Scenario may only affect one attribute. The screenshot below shows the attribute field with the drop down arrow.
Choose Attribute

Note
The Available attribute cannot be adjusted via Scenarios. Scenarios can only adjust data for combinations of elements for which there is (non-zero) input data for some Attribute, typically Available, already.
Adjustment
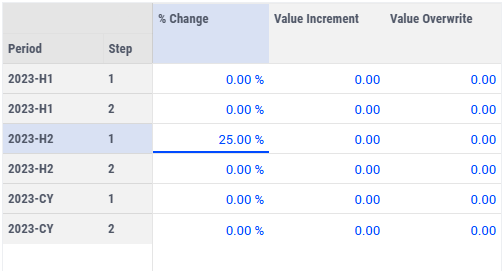
Following the selection of the attribute, the next section in creating a Scenario is the Adjustment Table. Here, users can enter the type of adjustment that should be made. Most of the Adjustment Tables for Scenarios are based on the Period and Step, although this is not always applicable. As seen in the screenshot below, there are three types of adjustment:
% Change - increasing or decreasing an existing value by a percentage.
Value Increment - increasing or decreasing a value by a certain amount.
Value Overwrite - replacing a value with the one entered in the Adjustment Table.
Note, only one type of adjustment can be made in a Scenario, but this may be applied to multiple Steps and Periods within that Scenario.
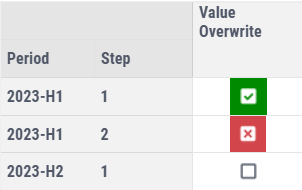
Certain attributes consist solely of binary values. The layout of the adjustment table may vary depending on whether the selected Attribute is binary.
You can modify the binary value directly by clicking on a cell, with three possible actions:
In the table, these options look as follows:
The final input section for creating or editing a Scenario is the description. Creating a description is optional, if no description is entered then the Scenario name will automatically be used in this field. The description can be useful for adding more context to the Scenario, which can be helpful when users are creating many Scenarios and need additional information to help describe what is happening in each one. The description field supports multi-line input, as shown in the screenshot below:

Item Actions in Create Mode
There are two Item Actions that can be used when in Create Mode. Both of them are accessible by right-clicking on a cell in the Data Tabs area:
Add to Scenario - This action can be used to add more elements to the Scenario without needing to manually select them in the dialog screens shown above. This is only applicable for cells that contain the same attribute as the one selected in the Attribute field. Note that differences in Step and Period are handled in the Adjustment Dialog.
Remove from Scenario - This action can be used to remove elements from the Scenario without needing to make manual adjustments in the dialog screens. The action will only be available when the attribute and elements are already included in the Scenario.
Save and Overwrite
When in Edit or Create Mode, the Save and Cancel buttons are visible. Pressing Cancel will return to List Mode, none of the changes made since the previous save will be kept. Pressing Save when there is no Network Scenario loaded will simply Save the Scenario and apply it to the data. If a Network Scenario is loaded, or if you try to save two Scenarios with the same name, there will be an option to Overwrite or Save As.
1. Overwrite
Overwriting any type of Scenario will replace the previously saved Scenario data with the changes you have made. The Scenario that is being overwritten will no longer be accessible. Choosing to overwrite a Scenario or Network Scenario is only possible when there are no saved results that are associated with the Network Scenario. When in Create Mode, if you save a Scenario and there is a Network Scenario loaded, the Scenario will be saved regardless of whether you choose to overwrite the existing Network Scenario, or save a new one.
2. Save As
Save As will create a new Scenario or Network Scenario instead of overwriting an existing one. If the user is creating or editing a Scenario and they choose the same name as an existing Scenario, then they will have the option to Save As, creating a new Scenario. If the user is adding a Scenario to a Network Scenario, then they will have the option to save a new Network Scenario instead of overwriting by pressing Save As. When selecting Save As, the user will be prompted to choose a new name.
Note
It is not possible to overwrite a Scenario that is part of a Network Scenario when that Network Scenario has been used in any optimization run for which the results have already been saved before. You can still edit them, but the edited Scenario has to be saved under a different name.


