Getting Started with Transport Navigator
Transport Navigator is designed to help you quickly move from network design to tactical transport planning by building and analyzing fixed-route transport solutions. This guide outlines the recommended steps for setting up and running your first model using a template-based workflow.
Key Terms
Below is a list of key terms commonly used in the Transport Navigator module. These definitions help clarify the components involved in setting up your optimization model through managing vehicle movements, driver schedules, and delivery timelines.
Leg - The drive from one location to another. A leg is always part of a route. For example, driving from a warehouse to the first customer or from a customer to another customer.
Stop - The time spent at a location where the vehicle is stationary. For example, loading at a warehouse, offloading at a customer, a driver break or a layover.
Layover - A long break for the driver in which to sleep, typically overnight. For example, a 10 hours break after 14 hours of duty.
Route - A sequence of legs and stops, that begins and ends at the same warehouse.
Route plan - A sequence of routes for a single vehicle.
Schedule - A combination of route plans for all the vehicles at a warehouse.
Pattern - A combination of periods used for visiting a customer.
Driving Time - Time spent on the road driving.
Service Time - Time spent at the customer to offload the vehicle.
Reloading Time - Time spent at the warehouse to reload the vehicle for the next route.
Waiting Time - Time spent waiting. If the truck arrives before the delivery window opens, it has to wait until the delivery window opens.
Duty Time - Time spent by the driver on working activities. This is ‘Driving time’ + ‘Service Time’ + ‘Waiting Time’ + time at the depot in between trips.
Populate the Template
To get started, download and fill in the Transport Navigator Sheets using the SC Navigator data template. This template captures the essential information needed to model your transport network and run an optimization in Transport Navigator.
The Transport Navigator specific sheets are:
TN (String) Settings – Define general model parameters, such as solve time limits, the planning start date, units of measurement, and optimization options.
TN Periods – Specify the planning periods relevant to your model, such as individual days of the week or recurring planning cycles.
TN Period Groups – Specify how TN periods aggregate into groups.
TN Locations – List the warehouse locations from which routes can begin. Include any relevant constraints and associated fixed or variable costs.
TN Location TN Periods – If warehouse locations have opening hours and/or capacity restrictions, this information can be specified here.
TN Vehicles – Detail the vehicle types available at each warehouse, including capacity limits, operational constraints, and costs.
TN Pattern Groups – Specify how patterns aggregate into groups.
TN Pattern Period – Specify the fraction of weekly demand to be delivered for each TN Period in the TN Pattern.
TN Customer Product – Define the customers that must be visited, including demand quantities, service time windows, and any applicable delivery rules or constraints.
TN Fixed Routes – If certain customers must be served in a predefined order or on specific routes, you can enter that information here to guide or constrain the optimization.
Along with the information on the sheets listed above, the following generic SC Navigator data input sheets should also be configured:
Settings and String Settings in Notes, Settings and String Settings Sheets
Periods in the Periods Sheets
Products in the Product Related Sheets
Locations in the Location Related Sheets
Mode of Transport in the Transport Sheets
Customers in the Customer Sheets
Patterns and Warehouse Load Balancing
In most cases, the delivery day is fixed and the goal is to find the order in which the customers are visited. However, in some cases, there might be freedom in which day customers are visited. This freedom can be specified in sheet “TN Customer Product”.
To use this, the “TN Period” must be a curly bracket group and the column “Pattern Group” must be filled in. For instance, this setup allows the model to select a delivery day from a once-per-week pattern:
Product |
Customer |
Location |
Period |
TN Period |
Pattern Group |
Demand Volume |
Demand Weight |
Effort |
|---|---|---|---|---|---|---|---|---|
TO Product |
Bellevue, WA |
Bellevue,WA |
2025 |
{Daily} |
Once a week |
33.52 |
15157.4 |
3058.296 |
This tells us that the specified Demand Volume and Weight must be delivered across the TN Period Group “{Daily}”, according to the Pattern Group “Once a week”.
The period group “Daily” is specified in sheet “TN Period Groups” and could look like this:
TN Period |
SubTNPeriod |
Active |
|---|---|---|
Daily |
Mon |
1 |
Daily |
Tue |
1 |
Daily |
Wed |
1 |
Daily |
Thu |
1 |
Daily |
Fri |
1 |
The pattern group “Once a week” is specified in sheet “TN Pattern Groups” and could look like this:
Pattern |
SubPattern |
Active |
|---|---|---|
Once a week |
Monday Delivery |
1 |
Once a week |
Tuesday Delivery |
1 |
Once a week |
Wednesday Delivery |
1 |
Once a week |
Thursday Delivery |
1 |
Once a week |
Friday Delivery |
1 |
Where the sub patterns are defined in “TN Pattern Period” and could look like this:
Pattern |
TN Period |
Fraction |
|---|---|---|
Monday Delivery |
Mon |
1 |
Tuesday Delivery |
Tue |
1 |
Wednesday Delivery |
Wed |
1 |
Thursday Delivery |
Thu |
1 |
Friday Delivery |
Fri |
1 |
This all together means that this customer must be visited one day per week and the complete demand will be fulfilled on that one day.
- Note:
For now, the model only supports patterns where the Fraction is 1. In the future, it will be possible to have patterns that spread the delivery over two (or maybe more) days. This allows the model to generate solutions where a customer is being visit on “Monday and Thursday” or “Tuesday and Friday”.
This freedom can be used to get better/cheaper solutions compared to datasets where the delivery day is fixed. However, it can also be used to spread the warehouse effort across the days using “Minimum Relative Capacity” and “Maximum Relative Capacity” on sheet “TN Location TN Periods” (TN Location TN Periods).
Upload and Validate Data
Once your data template is complete, upload it into Transport Navigator. A data validation will automatically check to catch common issues, such as missing values, mismatched IDs, or infeasibilities and anomalies that could result in unexpected model behavior or failed solves.
Take time to carefully review any flagged errors or warnings in the Data Issues page. Ensuring clean and consistent data at this stage is key to building a useful model.
Review Inputs and Configure the Model for Optimization
After passing validation, you will be taken to the Transport Navigator page. Here, you will see a map of your supply chain network, including all customers that are present in the input data. To review input data and create scenarios by adjusting the data, you can visit the Data page. For example, you may wish to adjust demand volumes, vehicle constraints, or time windows.
The Control Panel page can be visited to configure which data should be included in a Transport Navigator optimization. For example, your data model may contain many products, but you only wish to run the optimization for a single product. Similarly, the data may contain many warehouses, periods, or customers that you want to include or exclude from the optimization.
This step is where you align the model with your planning objectives and operating assumptions. It can be helpful to experiment with different configurations (scenarios) to understand their impact on the solution.
Start the Optimization
When you’re ready, click the Optimize button to begin the solve. Transport Navigator uses an advanced optimization algorithm to generate high-quality fixed routes and fleet requirements. You can read more about the solve process in the Transport Navigator Technical Details.
The optimization process runs until it reaches the predefined time limit set in your input data. It is important to note that the solver does not stop upon finding a solution; instead, it continues to search for improved solutions until the time limit is reached. This means that the quality of the solution can improve over time, and setting an appropriate time limit is necessary to balance between solution quality and computational resources.
Analyze the Results
Once the solver reaches the configured time limit, Transport Navigator returns a solution consisting of:
A set of fixed delivery routes
The fleet size and vehicle assignment needed to support them
Detailed information about stops, timings, and utilization
You can explore the results in both the Transport Navigator and Results pages. For a quick overview, click on KPI Summary in the status bar to open a dialog showing key performance indicators for cost, service, and vehicles.
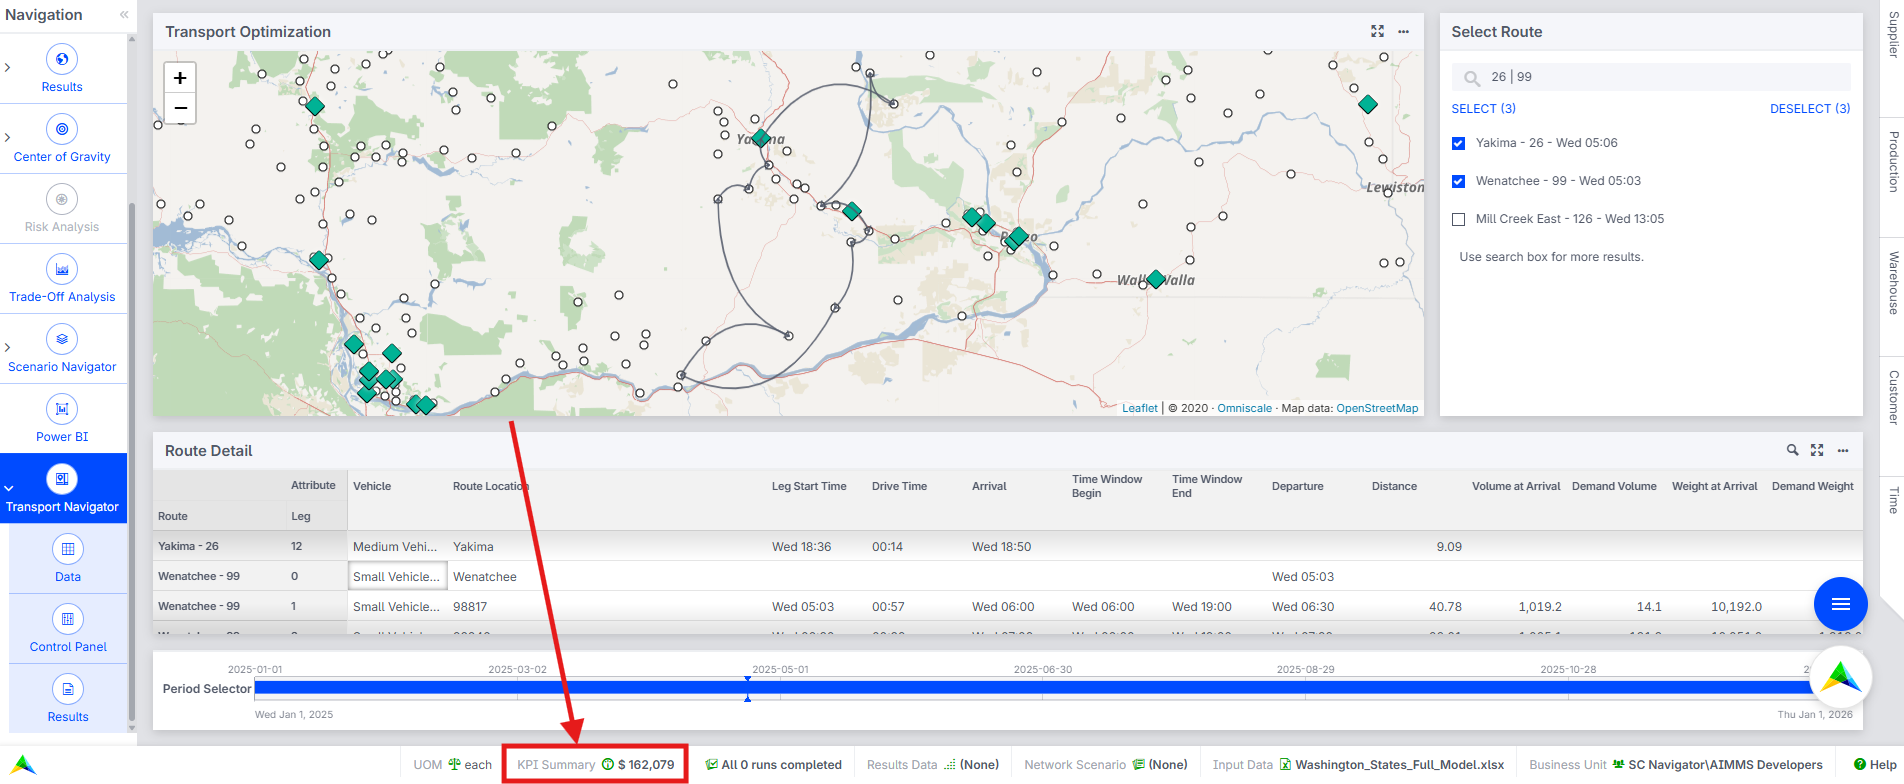
These KPIs help you evaluate whether the solution meets your operational and business goals. They also serve as a starting point for further refinement or comparison between scenarios.